Sass基础篇
- 安装Ubuntu
http://www.cnblogs.com/zhcncn/p/3987301.html
不知道为什么我的不能安装gdm,安完之后就就启动不起来了,有必要探究下了,书还没到,学会了这块补上
- 安装sass
先安装ruby,已经自带了,可能要升级
之后安装sasshttp://www.w3cplus.com/sassguide/install.html
python已经到2.7了,哈哈,linux上跑这些奇怪的东西比windows下好多了
0.什么是Sass
SASS是一种”CSS预处理器”(css preprocessor),提供了许多便利的写法,大大节省了设计者的时间,使得CSS的开发,变得简单和可维护。它的基本思想是,用一种专门的编程语言,进行网页样式设计,然后再编译成正常的CSS文件。
1.Sass命令编译
- 单文件编译
1
| sass <要编译的Sass文件路径>/style.scss:<要输出的css文件路径>/style.css
|
如果想对整个项目所有Sass文件编译成css文件,可以这样操作:
该命令将项目中”sass”文件夹下所有”.scss”(“.sass”)文件编译成”.css”文件,并且将这些css文件都放在项目中”css”文件夹中。
2.开启watch功能
1 2 3 4
| // watch a file sass --watch input.scss:output.css // watch a directory sass --watch app/sass:public/stylesheets
|
3.四种编译风格
3.1 嵌套输出方式nested
嵌套缩进的css代码,它是默认值。
1 2 3 4 5 6 7 8 9 10 11 12 13 14 15
| nav { ul { margin: 0; padding: 0; list-style: none; } li { display: inline-block; } a { display: block; padding: 6px 12px; text-decoration: none; } }
|
编译:
1
| sass --watch test.scss:test.css --style nested
|
编译结果:
1 2 3 4 5 6 7 8 9 10
| nav ul { margin: 0; padding: 0; list-style: none; } nav li { display: inline-block; } nav a { display: block; padding: 6px 12px; text-decoration: none; }
|
3.2 展开输出方式expanded
没有缩进的、扩展的css代码。
1 2 3 4 5 6 7 8 9 10 11 12 13 14 15
| nav { ul { margin: 0; padding: 0; list-style: none; } li { display: inline-block; } a { display: block; padding: 6px 12px; text-decoration: none; } }
|
编译:
1
| sass --watch test.scss:test.css --style expanded
|
编译结果:
1 2 3 4 5 6 7 8 9 10 11 12 13
| nav ul { margin: 0; padding: 0; list-style: none; } nav li { display: inline-block; } nav a { display: block; padding: 6px 12px; text-decoration: none; }
|
这个输出的 CSS 样式风格和 nested 类似,只是大括号在另起一行
3.3 紧凑输出方式compact
1 2 3 4 5 6 7 8 9 10 11 12 13 14 15
| nav { ul { margin: 0; padding: 0; list-style: none; } li { display: inline-block; } a { display: block; padding: 6px 12px; text-decoration: none; } }
|
编译:
1
| sass --watch test.scss:test.css --style compact
|
编译结果:
1 2 3
| nav ul { margin: 0; padding: 0; list-style: none; } nav li { display: inline-block; } nav a { display: block; padding: 6px 12px; text-decoration: none; }
|
特点:单行显示
3.4 压缩输出方式compressed
1 2 3 4 5 6 7 8 9 10 11 12 13 14 15
| nav { ul { margin: 0; padding: 0; list-style: none; } li { display: inline-block; } a { display: block; padding: 6px 12px; text-decoration: none; } }
|
编译:
1
| sass --watch test.scss:test.css --style compressed
|
编译结果:
1
| nav ul{margin:0;padding:0;list-style:none}nav li{display:inline-block}nav a{display:block;padding:6px 12px;text-decoration:none}
|
特点:压缩好的css代码,一般用于生产环境
4.Sass的调试
Sass的调试需要浏览器支持”sourcemap”功能,早一点的版本,需要在编译的时候添加”–sourcemap”参数
1
| sass --watch --scss --sourcemap style.scss:style.css
|
5.Sass 变量
SASS允许使用变量,所有变量以$开头。如果变量需要镶嵌在字符串之中,就必须需要写在#{}之中。
1 2 3 4
| $side : left; .rounded { border- }
|
编译结果:
1 2 3
| .rounded{ border-left-radius: 5px; }
|
sass 的默认变量一般是用来设置默认值,然后根据需求来覆盖的,覆盖的方式也很简单,只需要在默认变量之前重新声明下变量即可。
1 2 3 4 5
| $baseLineHeight: 2; $baseLineHeight: 1.5 !default; body{ line-height: $baseLineHeight; }
|
编译后的css代码:
5.1嵌套规则
5.2 选择器嵌套
1 2 3 4 5 6 7 8 9
| nav { a { color: red; header & { color:green; } } }
|
编译结果
1 2 3 4 5 6 7
| nav a { color: red; } header nav a { color: green; }
|
属性嵌套
1 2 3 4 5
| p { border: { color: red; } }
|
注意这个”:”
#代码重用
6.混合宏mixin
6.1声明混合宏
不带参数
1 2 3 4
| @mixin border-radius{ -webkit-border-radius: 5px; border-radius: 5px; }
|
带参数
1 2 3 4
| @mixin border-radius($radius:5px){ -webkit-border-radius: $radius; border-radius: $radius; }
|
6.2 调用混合宏
1 2 3 4
| @mixin border-radius{ -webkit-border-radius: 3px; border-radius: 3px; }
|
调用
1 2 3
| button { @include border-radius; }
|
编译结果:
1 2 3 4
| button { -webkit-border-radius: 3px; border-radius: 3px; }
|
7.继承
SASS允许一个选择器,继承另一个选择器
1 2 3 4 5 6 7
| .class1 { border: 1px solid } .class2 { @extend .class1; font-size:120%; }
|
##8 占位符
Sass 中的占位符 %placeholder 功能是一个很强大,很实用的一个功能,这也是我非常喜欢的功能。他可以取代以前 CSS 中的基类造成的代码冗余的情形。因为 %placeholder 声明的代码,如果不被 @extend 调用的话,不会产生任何代码。
1 2 3 4 5 6
| %mt5 { margin-top: 5px; } %pt5{ padding-top: 5px; }
|
这段代码没有被 @extend 调用,他并没有产生任何代码块,只是静静的躺在你的某个 SCSS 文件中。只有通过 @extend 调用才会产生代码:
1 2 3 4 5 6 7 8 9 10 11 12 13 14 15 16 17 18 19 20
| //SCSS %mt5 { margin-top: 5px; } %pt5{ padding-top: 5px; } .btn { @extend %mt5; @extend %pt5; } .block { @extend %mt5; span { @extend %pt5; } }
|
编译结果:
1 2 3 4 5 6 7 8
| //CSS .btn, .block { margin-top: 5px; } .btn, .block span { padding-top: 5px; }
|
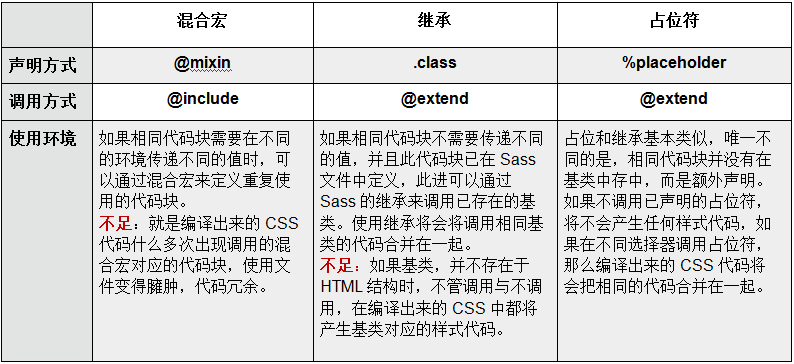
!混合宏VS继承VS占位符
9.插值(难)
1 2 3 4 5 6 7 8 9
| $properties: (margin, padding); @mixin set-value($side, $value) { @each $prop in $properties { } } .login-box { @include set-value(top, 14px); }
|
编译结果:
1 2 3 4
| .login-box { margin-top: 14px; padding-top: 14px; }
|
当想设置属性值的时候你可以使用字符串插入进来。一个有用的用法是构建一个选择器,比如:
1 2 3 4 5 6
| @mixin generate-sizes($class, $small, $medium, $big) { . . . } @include generate-sizes("header-text", 12px, 20px, 40px);
|
编译结果:
1 2 3
| .header-text-small { font-size: 12px; } .header-text-medium { font-size: 20px; } .header-text-big { font-size: 40px; }
|
10.变量计算
1 2 3 4 5 6 7 8
| $col-width: 60px; $col-gap: 20px; @for $i from 1 through 12 { .col- width:$col-width+$col-gap; } }
|
编译结果:
1 2 3 4 5 6 7 8 9 10 11 12 13 14 15 16 17 18 19 20 21 22 23 24
| .col-1 { width: 80px; } .col-2 { width: 80px; } .col-3 { width: 80px; } .col-4 { width: 80px; } .col-5 { width: 80px; } .col-6 { width: 80px; } .col-7 { width: 80px; } .col-8 { width: 80px; } .col-9 { width: 80px; } .col-10 { width: 80px; } .col-11 { width: 80px; } .col-12 { width: 80px; }
|
参考阅读